WordPress is identified as the mainly accepted blogging platform and content management system. WordPress is as well famous for its simplicity. In most conditions, installing WordPress is an easy process that takes a few minutes for installation. In this tutorial, our objective is to tender a complete WordPress installation information for novices and advanced users.

Register a domain name:
This is one of the reasons to move to WordPress.org to begin with. On a business level, having a domain name gives you a certain amount of credibility and seriousness. This is especially important if you plan to sell advertising on your page. For your users, domain names should reflect the name of your business so that they are easier to remember than a string of subdirectories. Finally, if you have your own domain name, your domain goes with you if you change hosts.
To register a domain name, you must register the domain with an organization called ICANN. Typically, you would go through a third party, a domain registrar. You will apply for a domain name, which must not already be in use, and pay a registration fee of around US$10 to US$35 to own that domain name for a year. It needs to be renewed every year for, typically, the same amount per annum.
If you do not have a web host, you can have your registrar park the domain temporarily for you. If you do have a web host, ask them for the names of their name servers. There should be a primary nameserver and a secondary one. Keep this information handy: you will need it for your domain name to point to your website.

Often, beginners may ask if it is possible to install WordPress on a local computer. The short answer is that yes, you can; however, WordPress is software intended to be installed on a host computer that serves content to the Internet. In order to make your blog available on the internet, in order to install themes and plugins, in short, to be able to use WordPress as intended, it should be installed on a host/server, and not on your local computer.
You can install WordPress manually, although many hosting companies provide a script to initiate and drive the installation. In this manual, we will look first at some of the most popular scripts, and then we will look at how to manually install WordPress. Finally, we will look briefly at some of the setup options in the Dashboard.
Set up WordPress on your hosting computer:
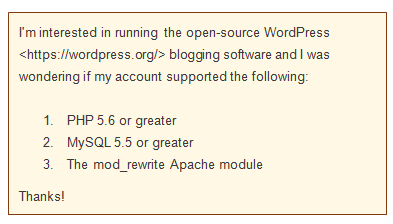
1) You’ll need to check with your hosting service to ensure they meet the rather modest basic requirements needed for installing and running WordPress:
a) PHPversion 5.6 or greater
b) MySQLversion 5.5 or greater
 The WordPress organization makes the following letter template available for querying your hosting service:
2) According to the WordPress organization, on their requirements page they recommend Apache or Nginx for running WordPress as being robust and feature-rich, but any server that supports PHP and MySQL should do. See the document “Installing WordPress 4.3.1 Step by Step”.
3) WordPress recommends, though does not require, that WordPress is run using an account username instead of the server’s default (and shared) username. This increases security for WordPress, and for all PHP applications. Most hosting companies will accomplish this using suPHP. Ask your host if they run suPHP or similarly.
Scriptted Button – Single Click WordPress Installation:
Many hosting companies might offer other scripted Installation buttons to start the process.
It starts by clicking the “Install button”, providing a certain amount of necessary information, then letting the script do the installation work. Some examples of these scripted installations are as follows:
SimpleScript:
Many hosting companies, like Bluehost.com, give you SimpleScript installation for WordPress. Most of the scripted installations follow a similar process, so we will look at SimpleScript first, and then take a quick look at some of the other scripted installations for WordPress.
1) In most web hosting companies, you will just see the SimpleScripts icon, though some offer one-click installation of WordPress. Find the appropriate icon (SimpleScripts or WordPress) on your host’s control panel and click it.


2) This will bring you to the Simple Scripts page, whichever icon you click. Here you can install and run the WordPress installation script, or – if available – run the one-click button from your hosting company’s page.

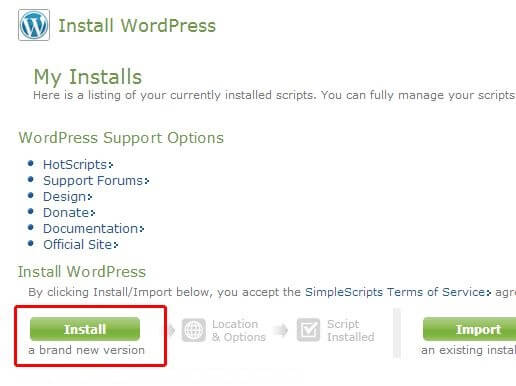
3) Click on WordPress to navigate to a page with an install button. This will be your WordPress Installation management page. Click Install a brand new version.
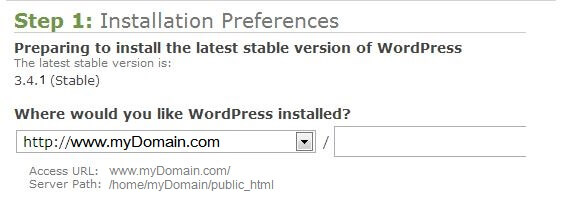
4) Clicking on the Install button will take you to a preferences page for your installation. First, choose the location where you want to install WordPress. You also will choose the title of your blog on this screen, though you always change it later.
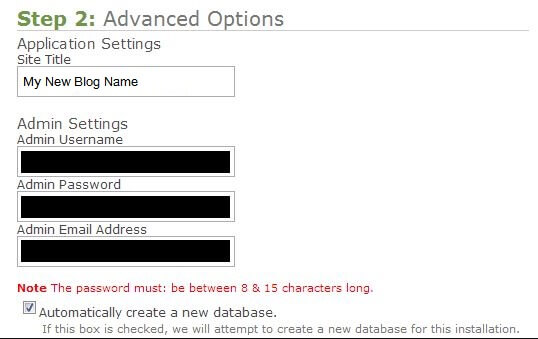
5) Also, Here is where you choose your user credentials. Click on the link that says Click here to show more to change the credentials. It is recommended that you use a unique username – i.e., not “admin” – and that your password is strong.
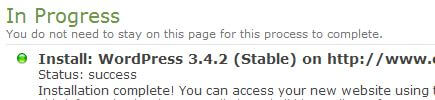
6) If you scroll down you can accept the terms of service and click on the complete button. You will receive a “success” message telling you “you do not have to keep the page open to complete the installation”, you can access your blog. This page will also give you your login information: site URL, admin URL, username, and password.
7) Login using the admin URL, and the username and password supplied. This will bring you to the WordPress Dashboard.

Softaculous:
Softaculous is another scripted installation that your hosting company may make available to you.
1) From your hosting company’s control panel, click on the Softaculous

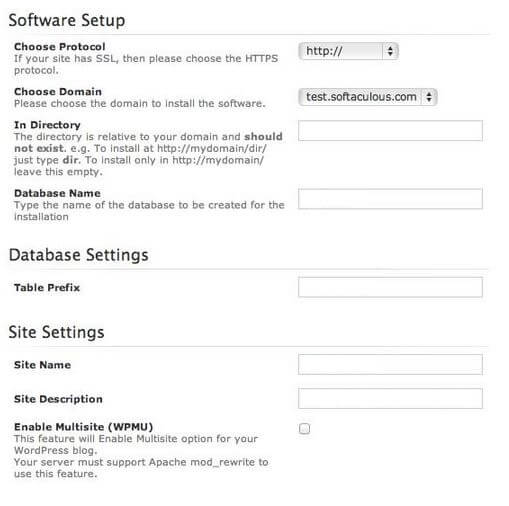
2) From the launch screen, click the WordPress button, then Install. Next, you will need to fill in some other important information, like your domain name, the database, and the protocol.
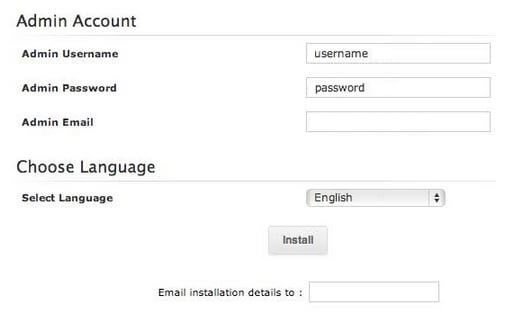
3) Scroll down a little farther to configure the admin settings. It is recommended that you use a unique username – i.e., not “admin” – and that your password is strong. Now click the Install
4) Now you can go to your admin URL and log in to get to the dashboard as above.
Fantastico:
Fantastico used to be the scripting installer of choice. It ships automatically with most cPanel web hosting applications.
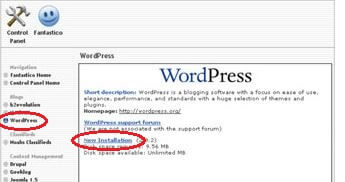
1) From your hosting company’s control panel, click on the Fantastico button.

2) Click the WordPress button in the “blogs” list on the left-hand side of the screen. Select the New Installation link on the right-hand pane.
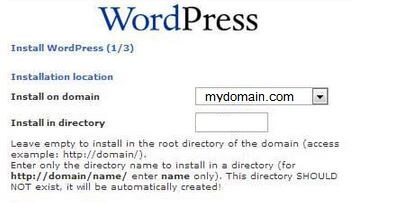
3) In the next screen, make a selection from the Install on domain drop-down to choose the domain on which you want to install WordPress. Type in a directory name in the Install in directory To keep the blog on the main domain, leave this field blank.
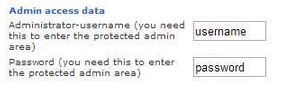
4) In the Admin access data section, enter a username and password that you will use to access the WordPress dashboard. It is recommended that you use a unique username – i.e., not “admin” – and that your password is strong.
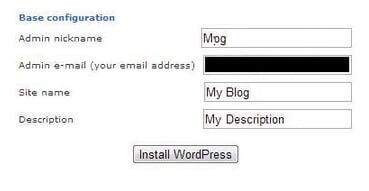
5) In the Base configuration section, enter a nickname for the admin account, a valid email address, as well as a site title (site name) and descriptions. This information can be changed later if you want. When you are satisfied with the configuration, click on the Install WordPress
6) On the next page, you have a chance to confirm all the information you supplied. Review the information, and click Finish Installation to continue.
7) The installation will complete on its own. Access the Dashboard as before, by going to your admin URL and entering your login credentials.
Install WordPress Manually:
If you do not have a scripting option provided to you by your web hosting company, or if you prefer to interact directly with the installation application, the following are full installation directions for WordPress. We strongly recommend that you check with your hosting company prior to starting this process. Ensure you have the following:
- Access to your web server via FTP or shell;
- A text editor;
- An FTP client;
- Your preferred web browser.
1) Obtain WordPress at this location: https://wordpress.org/. As of the publication of this article, the most up-to-date supported version is v4.3.1.
i) Click Download WordPress.
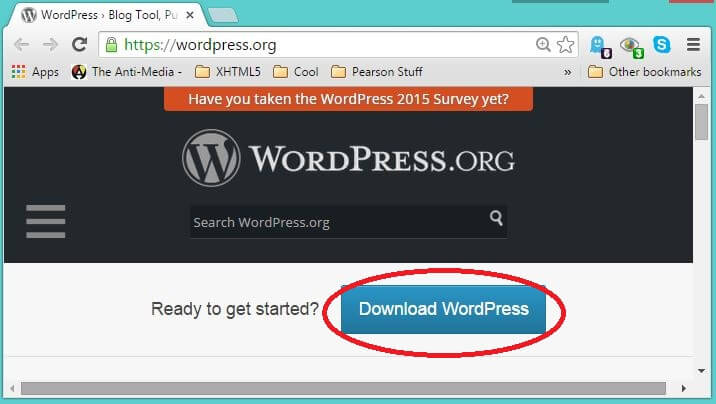
ii) Scroll down the page until you find the download button: Download WordPress 4.3.1. Click on it.
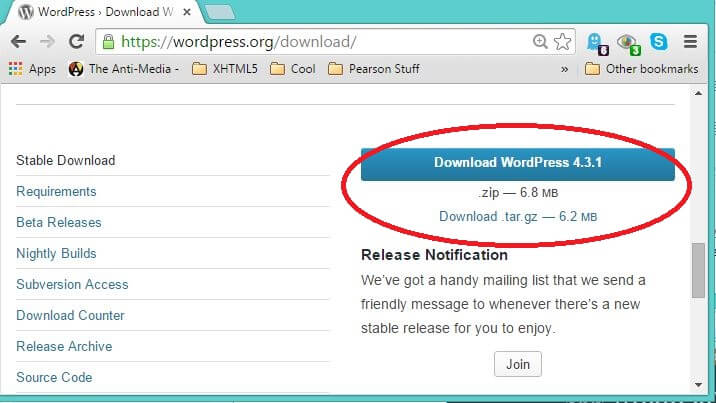
- This will download a zip file, which you will extract locally.
2) Upload the WordPress files to your web hosting account on the server using FTP.
i) If you want this WordPress installation to be the main, or landing, page for your website, place the files in the public_html folder of your account. Be sure to move the contents of the directory, but not the directory itself.However, if only part of your website runs on WordPress or if, for any other reason, you don’t want the blog in the main directory, you can create a subfolder (for instance, public_html/myOtherBlog) and place the files there. If you choose this option, rename the directory “wordpress” and upload the entire directory with all its contents.
ii) Note that tar.gz files are also supplied. If you have shell access to your web server via FTP or shell, and if you are comfortable using command-line (console) tools, you may prefer to download WordPress directly to your web server using wget if you want to avoid FTP:
wget http://wordpress.org/latest.tar.gz
Unzip the package using:
tar -xzvf latest.tar.gz
The WordPress package will extract into a folder called “wordpress” in the same directory that you downloaded latest.tar.gz.
3) Create a MySQL Database and a User. WordPress stores its information in a database, so your next step is to set up a MySQL database. Your hosting company may already have a WordPress database set up for you, or may provide an automated database setup. Check with your hosting provider to see if you will need to create a database manually. If you have an existing database, which is already in use, you can use it to install WordPress anyway; you must be sure to use a unique prefix for your tables to ensure you do not overwrite any existing tables.
i) If you need to create a database manually, you probably have support from your hosting company anyway, they provide assistance via Plesk or cPanel or similar. We will use cPanel as an example, as the process is typical of any of these interfaces.
ii) Log in to cPanel. Check with your hosting company to ensure you have the right instructions. They will provide the correct URL for you, which you will log into with your account admin credentials. This will bring you to cPanel. Be aware that cPanel can be customized with themes, skins, contents, etc., so what you see may be different from that shown below. We are showing the database panel, which will be one of several themed panels in your cPanel installation.
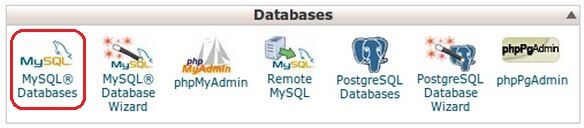
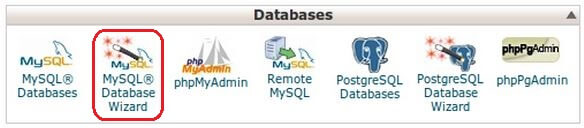
iii) Click MySQL/MySQL® Databases.
iv) Enter the desired name for your new database in the New Database field. Click on the Create Database button. Note that, depending on the configuration, including versions and themes, you may click the buttons that say “Next Step” or “Create User” rather than “Submit” or “Make Changes”, but the basic steps do not change.
Keep track of your database name, username, and password. Note them down and keep in a safe place for future reference.
v) A confirmation screen will display, showing that your new database was successfully created. Click on the Go Back button to return to the Database Management screen.
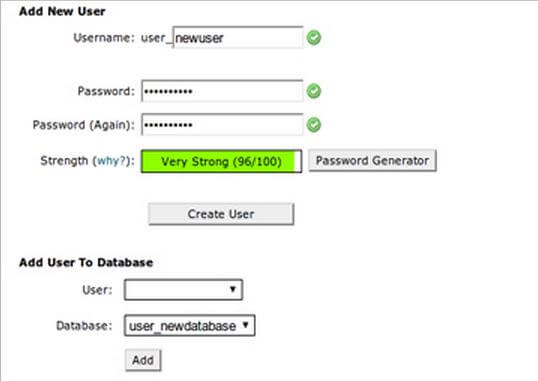
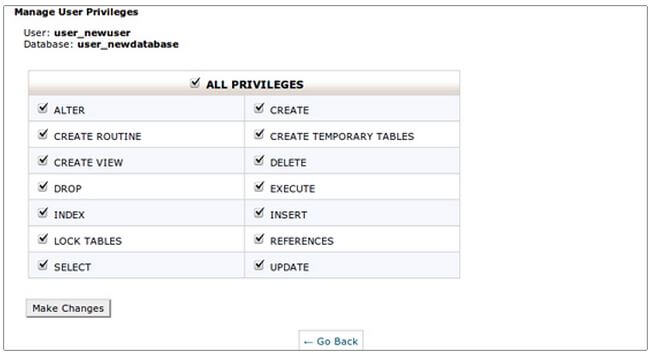
vi) Confirm or change your username and click Submit to save. When you submit, you will be redirected to a screen where you can manage user privileges, as below. Click Make Changes when done.
vii) Note that the MySQL Wizard will accomplish the same thing with a little extra support along the way.
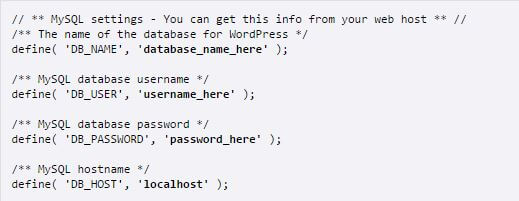
4) Configure wp-config.php. The wp-config-sample.php file contains the database information and gives the WordPress application instructions on where (which database) contains the information requested. You can configure this manually, or you can let it be configured as part of the WordPress installation.
i) If you are configuring it manually, return to the files that you originally extracted from the WordPress downloaded .zip file. Find the file named wp-config-sample.php and rename it wp-config.php.
ii) Open wp-config.php in a text editor.
iii) In the section labeled MySQL settings, fill in the requested information at the appropriate keys. This information will include the name of your database, the hostname, user information, and so on.
iv) In the section labeled Authentication Unique Keys, enter your secret key value. The easiest way to do this is to use the online generator. You do not have to remember this key; the database will use it for enhanced security in the background. Note that you can also configure WordPress for SSL. This is also done in the wp-config.php file.
v) WordPress.org provides detailed instructions for configuring this file for a more advance level here.
5) Run the Installation. Return to the directory where you extracted the files from the WordPress download.
- If you placed the WordPress files in the root directory, you should visit: http://example.com/wp-admin/install.php
- If you placed the WordPress files in a subdirectory called newblog, you should visit: http://example.com/newblog/wp-admin/install.php
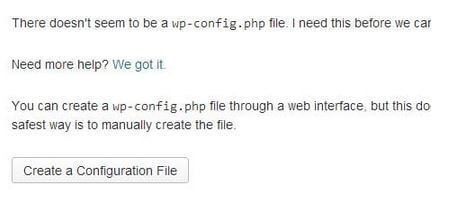
i) If you did not manually configure wp-config.php, you will see a screen prompting you to create this configuration file. Click Create a Configuration File to complete this step.
On the next page, the information will be automatically populated with the database information as listed above. Click Submit.
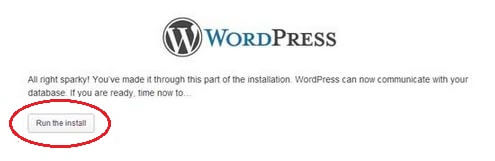
ii) A page will now display where you can initiate the installation. Click Run the install.
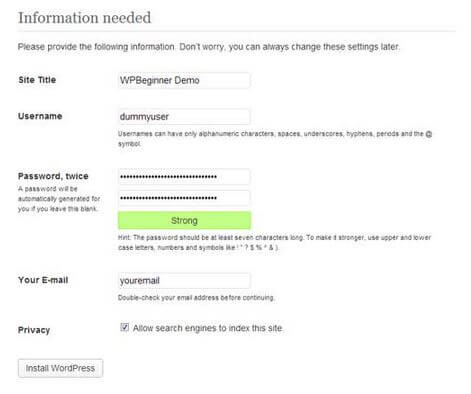
iii) Once you click the button, the installer will want just a little more information. On the next screen, fill out your site title, username, and password, email, and privacy settings. Then click Install WordPress.
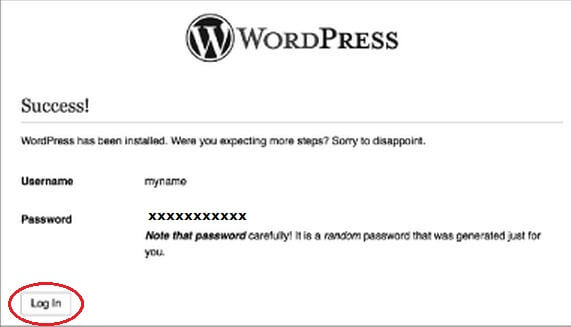
iv) When the installation is done, a success screen will load. Congratulations! You have successfully installed WordPress. Click the Log in button to start writing or to access the Dashboard for administrative control.
So happy blogging.
Quick Links:


Thanks Dhaval, This Article is really helpful who wish to start his blogging journey on WordPress