If you are successful with your WordPress.com site, you may soon outgrow it. WordPress.com is a terrific resource for the casual blogger, but when you really want to make use of WordPress features and potential, you’ll want more control over your site. WordPress.org offers that control, and provides you with the WordPress.com framework, as well as a development environment in which you can add true customization to your site in the form of plugins, themes, and advertising.
This is a comparison between the feature sets of each type of WordPress installation:
| WordPress.com | WordPress.org |
| Free up to 3 GB. You can purchase more space, or pay to make your page ad-free or to have its own domain. | You have to find and pay for your own hosting. This is associated with a monthly hosting cost, which can get expensive for a high-traffic site. |
| There is no maintenance overhead. | You’re responsible for maintenance. You will have to consider things like backups, security, and updates. |
| You are limited to the preset themes in the WordPress library. If you want a custom theme, you can upgrade to CSS access for an additional fee. | In addition to having access to the WordPress themes and other libraries available on-line, you can build your own. Your ability to customize your site is not limited. |
| No outside plug-ins can be used, although there are some built-in plug-ins available. The VIP program allows plug-ins – and full customization, along with enterprise-level support. | All plug-ins are supported. |
| You must apply for right to sell ads on your site, and you are not allowed to apply unless you have a minimum of 25,000 page views per month. | You have autonomy over your site and can sell ads without limitations. |
| WordPress.com does not offer an ecommerce plug-in. | There are ecommerce plug-ins for WordPress. You can set up an e-store on your site, take donations, etc. |
You can see the power of plug-ins by visiting the WordPress.org official plugins site at https://wordpress.org/plugins/. Among the things you can accomplish with plug-ins, in addition to ecommerce, are:
- SEO and analytics
- CAPTCHA bot protection
- Site-mapping
- Spam control
- More sophisticated navigation controls
- Security and Malware protection
- Site-building software, including responsive design construction, SASS and Bootstrap integration
- Sliders
- Backups
- Widget creation – plus prewritten widgets that include a wide range of functions, from star-review systems to image management
You can also see the wide variety of prewritten themes available at https://wordpress.org/themes/ as well as by searching the phrase “WordPress Themes Download” in your search engine.

You will also see that many of these themes are free, and fully customizable. Even if you don’t choose to create your own theme, you have a lot of options to brand your website in the way that works best for you.
Migrating your WordPress.com blog to WordPress.org, Step-by-Step
Once you have decided to migrate your blog, you will create and configure your own self-hosted WordPress installation. In short, you will need to execute the following steps:
WordPress Installation:
-
- Purchase and register your own domain name
- Locate and hire a web-hosting company that meets the minimum requirements for hosting WordPress. At minimum, your host will need the following:
- PHP 5.6 or greater
- MySQL 5.5 or greater
- The mod_rewrite Apache module
- Download and unzip the WordPress package from the WordPress.org site.
- Upload the WordPress files to the desired location on your web server.
- Upload the contents to the root directory to have WordPress run in your main domain
- Upload the full directory to the desired subdirectory to have WordPress run within a part of your domain.
- Create a MySQL database on your web server (or create tables in an existing database).
- Create a database user who has all privileges for accessing and modifying it.
- Configure the file wp-config.php to add your database information and a private key. Note: this step is optional. If you do not perform it on your own, you will be prompted through the process when you run the WordPress Installation.
- Run the WordPress installation script by navigating to the file using a web browser. This should be the URL where you uploaded the WordPress files, and which you specified when setting up the installation.
- See the document “Installing WordPress Step by Step” for details on this process. Also see the following video:
With your new WordPress installation, you can start a new blog, but if you are moving to WordPress.org because your WordPress.com blog was a success, the main purpose of choosing self-hosting is so you can migrate that blog to take advantage of the customization and advertising benefits that you get with your own installation.
Moving WordPress.com to WordPress.org:
Once you have your self-hosted site set up, it is straightforward to migrate your blog. Presented here are the steps to follow, with explanations and screen shots. (Note that themes can affect the appearance, so look for the words if something is out of place.)
- Export your content from WordPress.com.
a.) Navigate to your WordPress site. Be sure you are in the View Site
b.) From the front page, click on My Site.

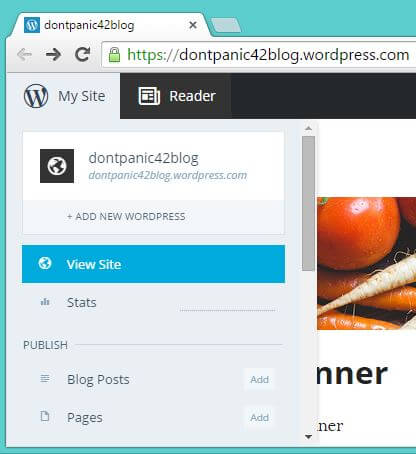
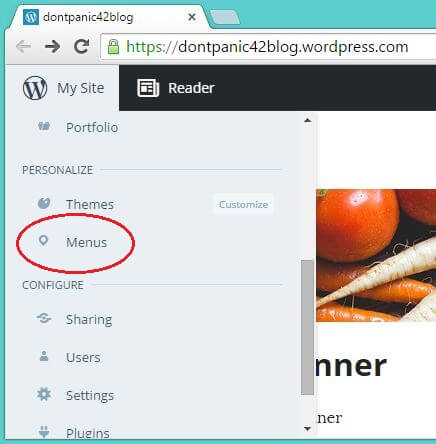
c.) This will bring up a long list of options. Scroll down until you see Menus under the subheading Personalize, and click on it.
d.) Now, when you look at your list of options, right at the top, directly under the View Site, you should see WP Admin. Click on it to reach the Dashboard.
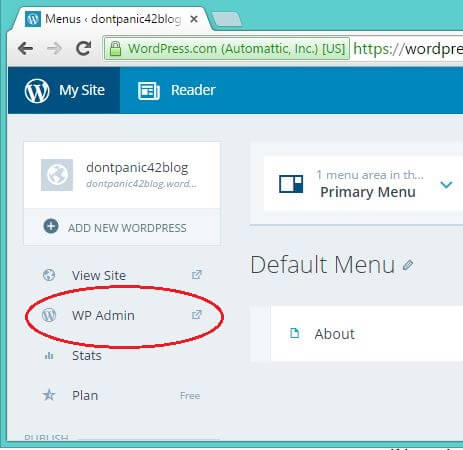
e.) This will bring you to the Dashboard. The Dashboard has a lot of stuff going on, but we’re only interested in the little section at the lower left.
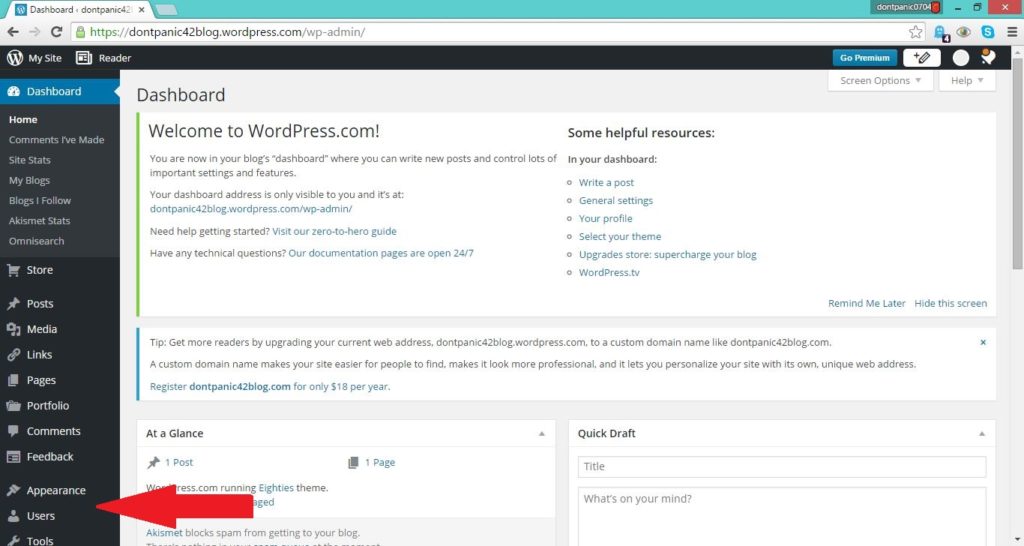
The dashboard.
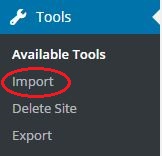
f.) Scroll down to see the menu in the lower left. Locate Tools and hover or click on it.
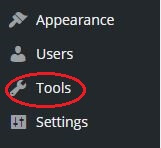
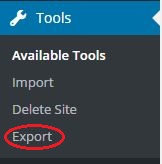
g.) When you click on Tools, you will get a submenu below it, whereas hover the mouse will pop up the submenu. The contents in both cases are the same. Locate Export and click on it.
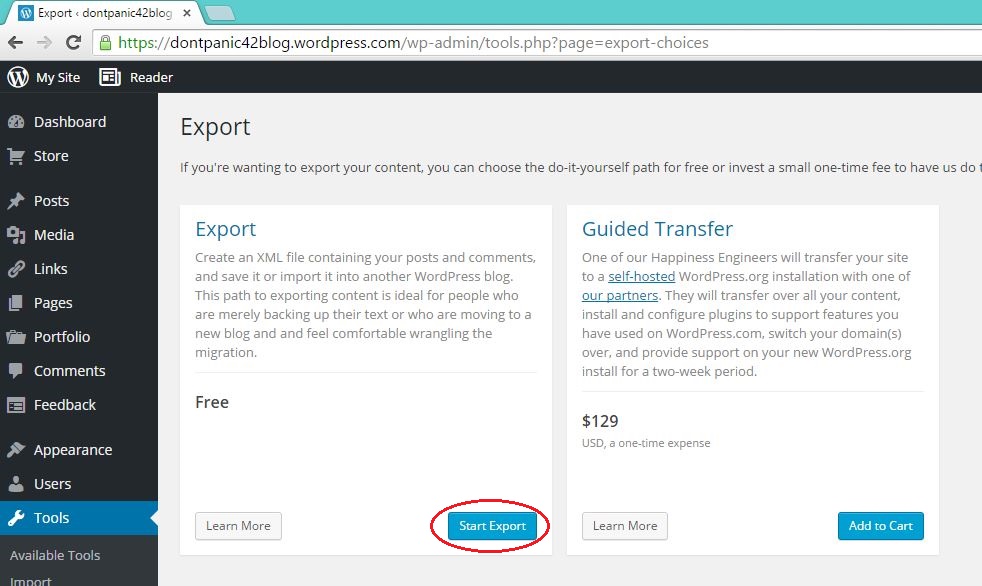
h.) This will bring you to the Export Options Choose the Free option and click on Start Export.
i.) The next page will give you a selection menu of what to export. Select All content, or select the subset for export, then click Download Export File.

j.) This will download an XML file to your default download location containing – as the screen explains – all of your posts, pages, comments, custom fields, terms, navigation menus and custom posts.
k.) The file will be named <yourBlogName>wordpress.<Date>.xml. Take note of its name and where it is.
- Import your content into your new WordPress.org self-hosted site.
a.) Your new WordPress.org site should be set up by now. If it is not, see the document “Installing WordPress Step by Step”, for details on this process.
b.) Now open the dashboard on your new, self-hosted, WordPress.org site. Navigate as you did before: first to your site, then to your admin menu, and finally to the tools. This time, when the tools menu opens, click Import.
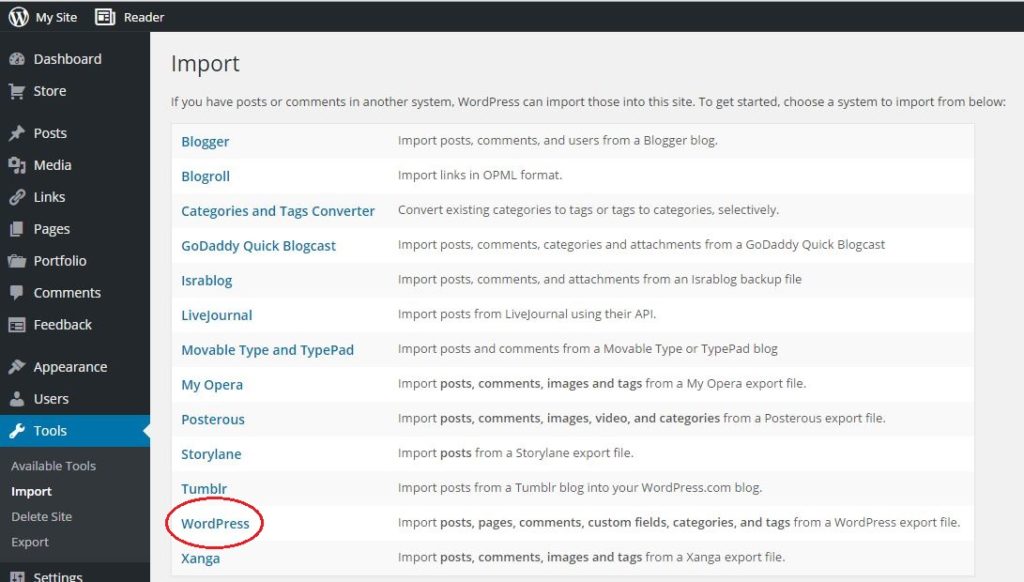
c.) This will bring you to the Import Options Click on the WordPress option near the end of the list.
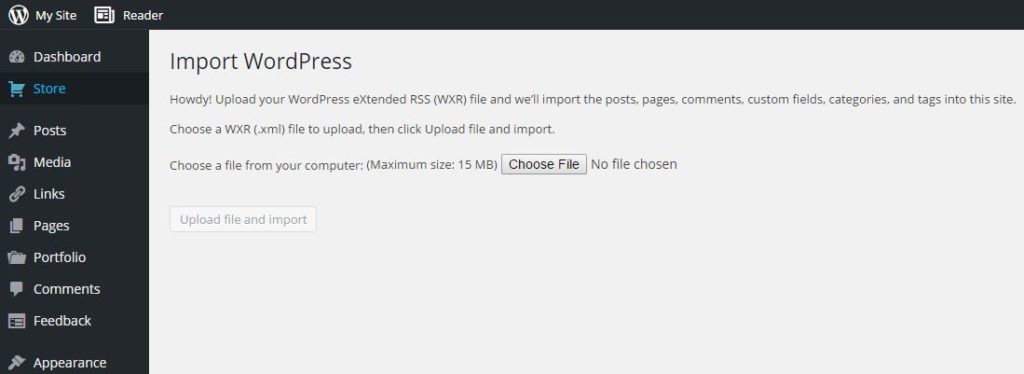
d.) When you click on WordPress, you will be prompted to find the XML file you created in your export.
Note:
you might be prompted to go to the WordPress.org site, and download the WordPress Import plug-in. Follow the link, click the download button, and install. Run the importer, and you receive the same dialogue box as below.
e.) Click on Choose File and navigate to the XML file you created in the export process. When you select a file, the text that reads No file chosen will change to the name of your file. Click Upload file and import.
Note:
There is a limit to the size of the file that can be uploaded. This file size is set by your web hosting company, who might be willing to lift that limit temporarily if your file exceeds the stated limit. Another option is to use a WXR splitter tool. You can find a tool to do that for you at this link: http://rangerpretzel.com/content/view/20/1/.
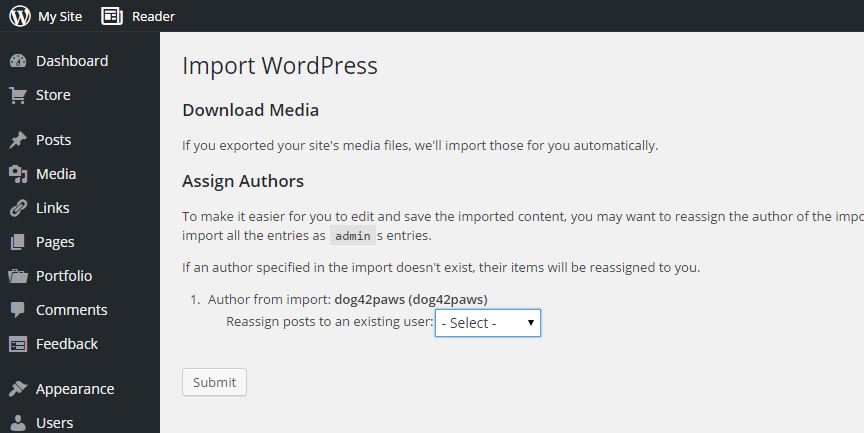
f.) When you start the import, you will have a choice of creating a new user or assigning the imported content to a current user. Choose the appropriate option at the Author from import: menu according to your strategy. Click Submit.
g.) When the import is complete, you will receive an email notification. Navigate to your blog and check things out – all should be as it was. You can now customize with themes or scripting, or leave things as they were while you get oriented. It’s up to you – the site is now wholly yours.
- Import your blogroll links if necessary. You have blogroll links if you have been using WordPress’s Links feature to store your links to other sites. If you were not using the Links feature, then you can skip this step.
Blogroll links exist in OPML (Outline Processor Markup Language) format, an XML format tuned to marking up outlines. In this case, the format is used for the interchange of information about links and link categories. Your WordPress.com links have an OPML file located at an address like this: http://<yourBlogName>.wordpress.com/wp-links-opml.php
a.) Navigate to your OPML file by using its URL. It will open in your browser window. Save it to your computer as an OPML file (for instance, myLinks.opml).
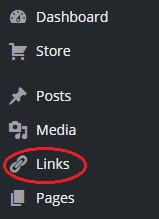
b.) Navigate as before to your Dashboard, and see if Links exists in the left-hand navigation column.
i.) If Links does not show up in your self-hosted menu, you will need to activate the Link Manager plug-in. The plug-in is at this location, https://wordpress.org/plugins/link-manager/ and once you install it, and the menu item will show up as above.
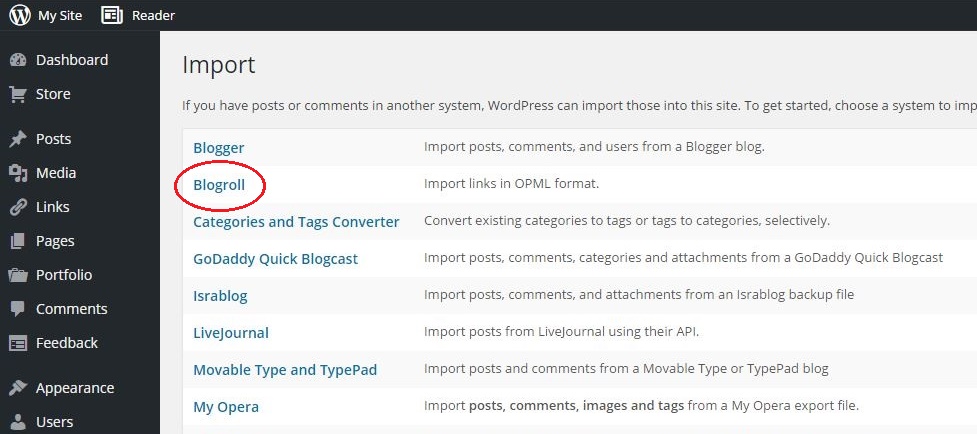
c.) Now go down to the Tools menu, still in the left-hand navigation column. Click Import again, and this time select Blogroll.
d.) Click Choose File and navigate to your OPML file. Select it and click Open.
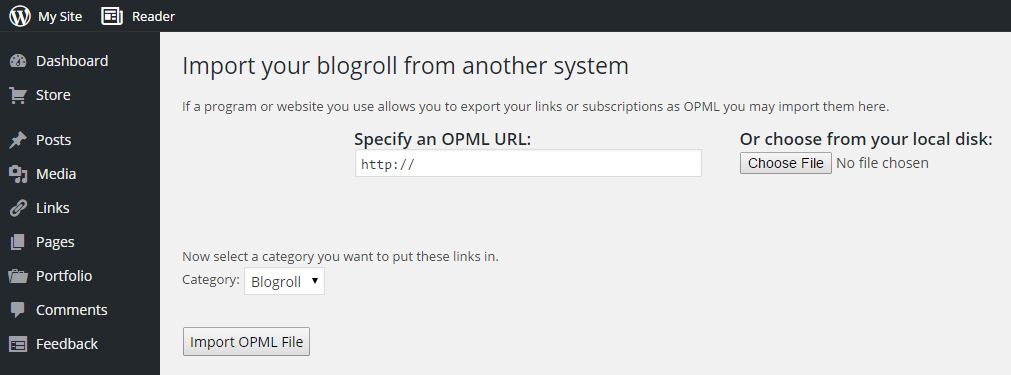
e.) Your links and link categories are imported into your self-hosted WordPress site. You will get a success message that offers a link to manage those links.
- Configure your public/private settings. You don’t want to have to maintain two blogs, so most likely, you will want to restrict access to the WordPress.com version. To do so,
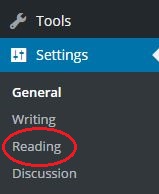
a.) Navigate to your Dashboard. Down in the left-land corner, at the end of the navigation column, select the Settings If you hover, a contextual menu will pop up, and if you click it, the menu will expand in the navigation column.

b.) Either way, select Reading from the contextual menu.
c.) From the Reading options that load in the right-hand pane, scroll down to the Site Visibility Select I would like my site to be private, visible only myself and the users I choose.

d.) Click Save Changes.
- Set up a site redirect at WordPress.com. You are migrating your site, probably because you have achieved some success. You want people to move seamlessly to your new location, once all is up and running on your new site. So a last thing to do is to set up a site redirect at WordPress.com.
a.) Site Redirect is a service that you buy from the WordPress store. As of this writing, the service was provided at $US 13 per year. It can only be pointed to a non-ssl (http:// ) url.
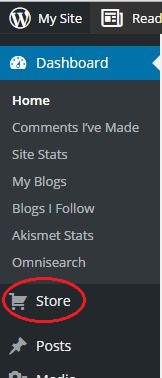
b.) Very simply, you enter the URL of your new self-hosted WordPress site and pay for the service. Visitors to your old WordPress site or blog will automatically be redirected to your new site.
Now you have a WordPress.org, open-source site which you can customize as much as you want with themes, plug-ins, and selling your advertising.
Quick Links:

that was easy, the procedure outlined above is easy to follow. well crafted tutorial…