In the era of blogging, when we see a lot of successful bloggers and digital marketers, we also want to start the same. But many new bloggers were in hurry and make few mistakes like buying the hosting from the unreliable companies. Here you will see all the reliable hosting companies and domain name.
Bluehost is the best option for WordPress. It is really simple to use and reliable.
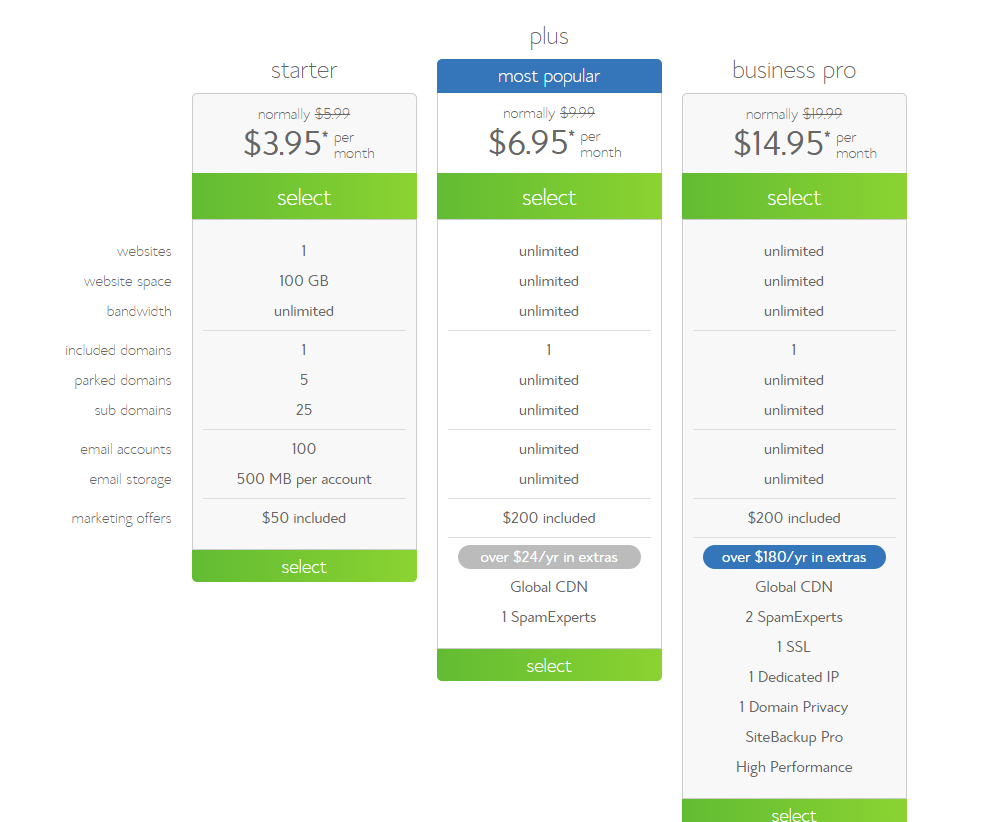
It provides professional hosting plans for $2.95/month. This is the first company that will recommend by me to you. It will be best for WordPress projects and will be quite efficient for the hosting site.

You will be getting a free domain name at the time of purchasing hosting. You can use this domain later after purchasing. They will also order you free AdWords and Facebook credits. But these free domains will only be available for 12, 24 or 36 months hosting plans. Total freebies:
- 1 free domain name
- $200 marketing offers
PROS:
- Unlimited domains
- Unlimited transfer
- Unlimited space
- FTP, SSL, PHP
- CGI, MYSQL, RUBY
- STATS, FREE SITE BUILDER
Through Bluehost hosting, you can use a free SSL certificate with the Bluehost hosting. When you will be using this then you will be migrated from WordPress blog from HTTP to HTTPS. Using SSL is one of the positive ranking factors. This is the sign of trust on your blog. When we are talking about SSL, you may use it free or you will have paid for this.

DOMAIN NAME:
If you want setup your business online across all over the world then definitely you need DOMAIN NAME. Most people like to use a domain which is actually free. Actually, these are third-party services like wordpress.com and tumbler. In some condition, this will be a good idea for small bloggers. But you want to stand in this growing market and want to let others feel your presence, then you should own a DOMAIN name. It is absolutely simple to get your own domain name. You should visit a good domain name registrar
Bluehost will provide free domain, in case you already have a domain name then you can use the free domain later. You can also go for free service like BustName, NameStation to complete the search for the good domain name.

MODE OF PAYMENT:
You have to make a payment when you will be purchasing the domain and web hosting with the provider. Payment can be done via credit card, debit card or you can PayPal. Before buying these things have a safe and secure mode of the transaction with your account.
FEW IMPORTANT THINGS:

Web hosting?
It is a service that makes your website available to be viewed by users all over the world.
These websites are stored on something special computers known as SERVERS. With your website, you can do online business, when someone visits your website or domain. Their computers will automatically connect to your servers and your WEBPAGES gets automatically delivered to the visitor automatically. Most hosting companies wish that you have your own domain. If you do not have any domain you can go and purchase one. There were many web hosting services.
Also Read:
How To START A Blog in 15 Mins Step By Step Newbie Guide
List of Top Best WordPress Hosting
The Cost of Starting a Self-Hosted WordPress Blog
Popular Web Hosting Companies Offering Free Domain Service
Best Bitcoin-Friendly Web Hosting
STEPS TO FOLLOW:

Go to the homepage of Bluehost and just click on to “get started now”. On the screen, you will see various packages in which you will be getting the services according to your plan. You should read the guide very carefully to make you aware of the terms and condition.
Their plans:
- Basic: you will get only one site
- Plus: running more than one site
- Prime: you will get SSL and a dedicated IP address
The cost of the prime and plus are same, it will be good to choose the prime. With the prime package, you can unlimited sites in the future if you need. Make sure you will be buying their plan for more than two or three years. This will lead you to save your money.
You have to choose the desired plan and “click” on it.
- Choose a new (free) domain or existing one:
")
After selecting your plan you will have the choice to choose the free domain by bluehost or just go with the existing domain name you have.
If you do not select your free domain now then you can choose it later when you want to do it.
If you choose the existing plan then you will have to change the nameservers at your domain registrars to;
- bluehost.com
- bluehost.com
If you did want to get things complicated then you can just go and register the new domain name with the servers and the free domain will be activated with hosting plan you have chosen. Just click onto “next”.
Adding account details:
You need to fill some basic details in this section like (name, email, address etc). Make sure you are entering the right information. And make sure to verify your email address details. Your log information will be sent to you via your email address.
Selecting the right package:
Make sure you are paying attention when you are doing this work. Because many times it happens that you may be charged extra for the add-ons. These are the services you may not need for the first time.
When you choose your package for about 24 to 36 months then you will be saving the money. There will be a huge difference in the tenure.
Make sure you have not selected the options like:
- Site backup pro
- Sitelock security
Complete the purchase:
Make sure you have verified your all information that you have entered. When you will be making the payment then you will be seeing that there is debit card option. If you want to make payment via PayPal then you can just click on the more option. You will be directed to that page. Go ahead and make payment.
On the next page, you will have a confirmation message of your hosting package. And just below you will see “create your password”.
Password selection:
Here, at last, you will be in the final stage, you be setting your password. I will recommend you to use a password generator and just copy and paste it. Make sure you have saved the password somewhere else safely.
Just click on the option “create” and you all ready to go.
Login to your web hosting cPanel:

After completing the above steps just go and check your email inbox, you will be getting a confirmation email with the login details of the related account.
Just go to the log in page of bluehost.com in that just fill the username and password!!
Just click on the “submit”.
Over To You : Buy Web Hosting With A Free Domain Name For Your WordPress Blog
Congratulations!! You have successfully purchased web hosting and domain name with Bluehost . When you will be doing all these steps, somehow if you stuck in between let me know about the problem. We will sort it out. Hope you like this guide !