Do you own a WooCommerce store?
Are you looking for a reliable plugin for Location picking during checkout?
If yes, then you must have searched the web for the same and come across several plugins that claim to be the best at executing this task. However, only some plugins deliver the purpose with perfection.

If you are confused about which one to try, then you are reading just the right post, as today we will take you through a comprehensive review of a popular Location Picker plugin for WooCommerce store owners, called Location Picker at Checkout (LPAC).
About LPAC

Location Picker at Checkout (LPAC) is an advanced WordPress plugin using which you can provide your customers greater control and flexibility over pickups and deliveries. It is an effective plugin, which was created for WooCommerce users, and enables store owners to give their WooCommerce store more flexibility by letting their customers specify exactly where they want to receive their product(s).
This plugin works wonders for businesses with delivery staff that serves consumers within a reasonable geographic area.
What Can You Do With LPAC?
With LPAC for WooCommerce, store owners can give their WooCommerce stores more flexibility by allowing their consumers to specify exactly where they want to receive their product(s). By contacting, emailing, or messaging consumers, store owners can obtain more precise location information without having to ask them for instructions or location data. It is therefore perfect for a variety of industries including the following:
- Online grocery stores – Delivery drivers cannot afford to waste time trying to find the perfect place to leave perishable goods.
- Cafes & Restaurants- Knowing the specific position of the consumer helps bring food swiftly and hotly, which improves the taste.
- Cab services – The customer specifies the map pin position for the cab or ride-hailing service from which they want the driver to pick them up.
Optimizing Customer Deliveries with LPAC
LPAC is considered to be one of the best WooCommerce plugins for optimizing deliveries for customers, and it is extremely simple to operate. Let us have a look at how it is done.
1) Download & Install LPAC Plugin
You first need to download the LPAC plugin from the WordPress plugin directory. The plugin is free to download and allows us to accomplish the majority of what we need to perform for this procedure.
To install the plugin from your desktop, first, download it. Then you need to navigate to the Plugins section in your WordPress Dashboard and then click “Add New”.
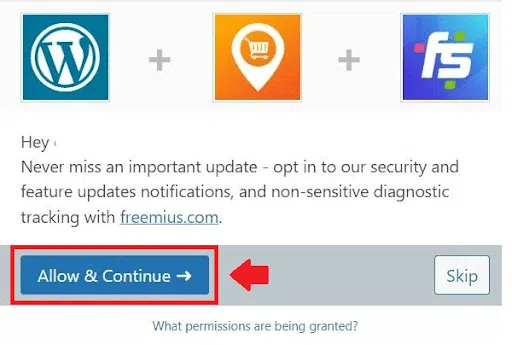
- Opt-in to important updates
Next up, you will be prompted to accept crucial security and feature upgrades after activation. When the plugin’s developers make modifications, doing this will guarantee that you’re always using the best version of the plugin.
- Get Your Google Maps API Key
The next recommended step is to go to the Google Maps platform and sign in with your regular Google account because you will need a Google Maps API key before you can do anything with Location Picker at Checkout. If you’ve never utilized Google Maps Platform, you must go through a brief onboarding procedure before being given an API key.
The onboarding procedure on the Google Maps Platform is easy. If you haven’t done it already, then you can follow our guide for the Google Maps Platform Onboarding and get it over within a matter of minutes.
Next up…
2) Set up Maps Options
For this plugin to work, make sure the “Enabled” checkbox, which is situated just above the Google Maps API Key entry area, is selected. You can configure some map behavior parameters below that; two to pay attention to are:
Detect Customer Location on Checkout Page Load: When the consumer arrives at the checkout page with this option enabled, Location Picker at Checkout will automatically make an attempt to determine their location. Customers who initially refuse to allow your site to find them will get a notification requesting them to enable it and describing how it benefits them.
Force Use of Map: This setting is advised because it guarantees that you will always get a location from the customer. A verification notification requesting that a consumer choose their location on the map will appear on the checkout page if they don’t do so.
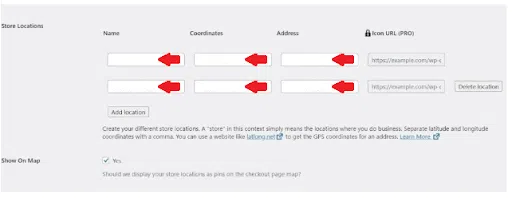
Setting up Store Location
The Store Location option will come in very handy if you manage your business from multiple locations. This helps you show your consumers where your stores are located and allows you to add each of your locations to the map so they may order from the one that is closest to them.
Additional Functions of LPAC
LPAC is one of the most advance and feature-rich plugins of its type. There are several more things that one can do with the power of LPAC.
- Set the map’s default coordinates. For instance, you can configure the map to display your town, city, or even the neighborhood that surrounds your place of business.
- Eliminate the Plus Code, which is produced automatically when a user chooses their address. The plus code, which appears next to their address, is a string of numbers produced by Google Maps. It is advisable to turn this off because it may confuse customers.
- Display the customer’s chosen location in the order confirmation email, past orders, and the order receipt page.
- Choose WHERE the map should be displayed, such as the shipping address area, the customer order received page, the customer past orders page, or the customer and admin order emails.
- The store owner can instruct LPAC to choose WHEN the map should display by using the “Visibility Rules”.
- Create a CSV file from your store orders that include a link to the customer’s location.
- To make the map more compatible with your website’s design, alter the colors, style, height, and width.
How Does The Plugin Work?
Now that you know how to do the basic setup after installing the plugin, let’s now have a quick look at how the plugin works for both customers and store owners alike.
For customers:
With a single button click, the plugin can locate them automatically. They can then use a map to make any necessary adjustments. Additionally, users can save numerous addresses, which is advantageous if they are regular customers.
For store owners:
It is simpler to deliver an item precisely when you can view the delivery position on a map in your dashboard. Depending on the customer’s location, you also have the option of changing your prices.
Location settings during Checkout
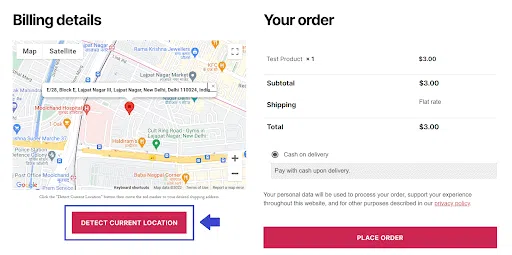
Customers will see a button to Detect the Current Location when they go to the checkout. Additionally, you can choose to display or hide this based on specific criteria.
Your business will immediately identify the customer’s precise location after they click the button, and the results will be displayed on a map. They will initially see the typical browser request for location services. The plugin can accurately detect your location, wherever you are. If needed, the customer can also move the pin around on the map to fine-tune their location.
After that, based on the customer’s selection on the map, the plugin can also use the Google Maps API to automatically fill in the customer’s shipping and/or billing addresses. You can also turn on address autocomplete, which aids customers in selecting the proper location by recommending nearby addresses as they type.
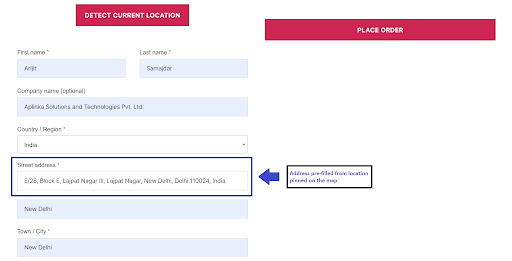
Additionally, if you prefer to use the address autocomplete just, you can fully hide the map. To use the address autocomplete feature, you might also enter an address in the street address field.
After completing Checkout
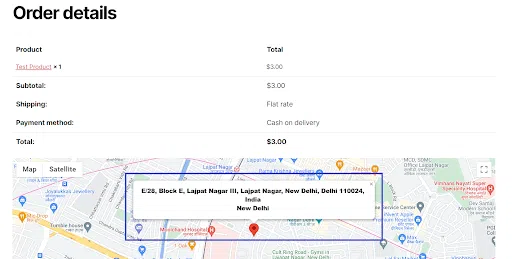
The plugin also includes capabilities that allow customers and store owners to simply see the location when the customer completes their order. On the page that confirms their order as well as in their My Account sections, customers can view a map of the delivery location.
Customers also have the option to save multiple addresses to help them save time in the future, for example, “Home” and “Work” addresses.
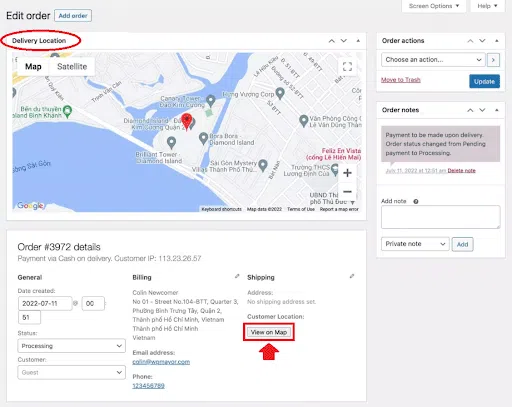
How do store admins manage the locations?
Store admins will also see the map in the order management area, as well as a button to let them open a dedicated maps window with the exact pin location. You can also include a link to the map location in admin-facing or customer-facing emails using a QR code, button, or link.
Here are a few other notable features that the plugin offers:
- Option to modify delivery costs based on a customer’s location region or distance.
- Option to restrict address autocomplete choices. You might, for instance, limit the autocomplete suggestions to those from your city.
- Google Maps graphics and marker icons are fully customizable.
LPAC Plans & Pricing
LPAC doesn’t include a trial version but all PRO features can be tested by launching a demo here. Currently, LPAC is available in three premium packages, namely, Single Site, Five(5) Sites, and Unlimited Sites. As obvious from the names, the plans have been differentiated based on the no. of sites they can support. For more details about these pans, the pricing, and features, visit the pricing section of LPAC.
Whichever plan you choose to buy, you will get access to all the plugin’s features, both free and premium. The plan you choose will determine how many websites/domains you can install and activate the license on. Keep track of how many locations each plan covers. If the need arises, you can also always upgrade your current license to the following tier.
Features included in the Premium plans
- Personalized Google Maps layouts
- Individual Marker Icons
- Locations for Export Orders
- Plot orders on a map to see where your orders are coming from and to identify the locations that receive the most orders.
- Multiple addresses that customers have saved
- Cost of Shipping by Region
- Cost of Shipping by Distance
- Cost of shipping by store location
- Shipping Price by Distance from Store
- Multi-store distance pricing: Based on the customer-selected origin store, calculate the cost by distance.
- Map based on Shipping Zone, Show/Hide until a minimum cart amount is reached, hide the map.
- When a maximum cart total is achieved, hide the map.
- Further Map Visibility Guidelines
- Places Autocomplete feature can only be used in certain nations.
- And More
Refund Policy
When refunds are handled, the payment gateways (Stripe and Paypal) employed by their payments system do not reimburse gateway fees. This implies that the LPAC payments system would be in the red if your initial full payment were reimbursed. As a result, refunds are given minus any gateway fees that were paid (usually a few dollars).
Also, Read:
- Best WordPress Podcast Plugins
- Best WordPress Content Locker Plugins
- Guide To Building Online Courses Using WordPress Plugins
- Top Best WordPress Plugins List You Must Have
- Restrict Content Pro Review
Conclusion: LPAC Review 2024
Altogether, LPAC is one of the most sorted plugins if you are looking for a viable option to smoothly manage your location-picking tasks during customer checkout, which is an essential aspect to handle if you are into the eCommerce or online selling business scene.
If you wish to learn more about this tool, then you can visit the LPAC official website or explore the plugin in the WordPress Plugin Directory.