Building a sales page and cart is a mandatory part of every online business. Every online seller has to create an attractive and demanding sales page to attract many customers and make them buy their products. Online traders have to use a suitable platform to make sales pages and sales carts to sell their products on and collect the online payments.
If you are a seller and using ThriveCart as your selling online platform, have you ever thought of creating sales pages and carts within 6 minutes using ThriveCart to take orders and collect online payments?
ThriveCart has a new feature called drag and drops sales page with cart builder. It can help you create a sales page and cart free of cost, or you can say at the price of ThriveCart only. You can save your money by spending on other tools outside ThriveCart to build these sales pages and carts. You can have great tools to create as many pages as you want on this platform.
I have done an in-depth ThriveCart Review to help you get detailed insights. Check the ThriveCart Review Here.
It is very easy to use and create pages here. You do not need to have any technical skills to create a sales page using ThriveCart. There is a natural process you can find here to help you quickly create the sales page. It does not charge any recurring fees for building sales pages and does not allow you to spend money to use external tools for making the same.
Let us take a look at the tour to build a sales page and cart using ThriveCart within 6 minutes.
How Can You Work with Landing Pages for Different Affiliates in ThriveCart?
If you are looking forward to working with landing pages on your website for sales, you can use the ThriveCart affiliate link from the dashboard to create landing pages. The traffic on your landing pages will depend on the traffic on the affiliate pages.
To redirect the user to the product’s URL, ThriveCart includes a query string that refers to the affiliate’s ID. A small script is present on the page that reads the query string, affiliate’s ID, and matches it to a current value. After reading these components, it redirects the assigned value to a different URL.
Your created affiliates will be provided with an affiliate link in ThriveCart to check and take the customers to the dedicated sales pages that refer to the referring member. PHP is used to read the query string of the affiliate and is used to check the affiliate ID and redirect it to the URL linked with that ID.
When you have successfully redirected the user to the specific URL, now you can send traffic to your site. By using an affiliate link, the buyers will be redirected to the dedicated landing page. And the users without the affiliate link will be redirected to the main page set of the product in ThriveCart.
Once the code is saved on the affiliate target URL, you have to set the product in ThriveCart. Once the affiliate has started directing traffic to your site, then they can be redirected to the URL of your new page. Members apart from the mentioned affiliates will be going to carry the default URL.
What are the Different Types of Cart Template Available in ThriveCart?
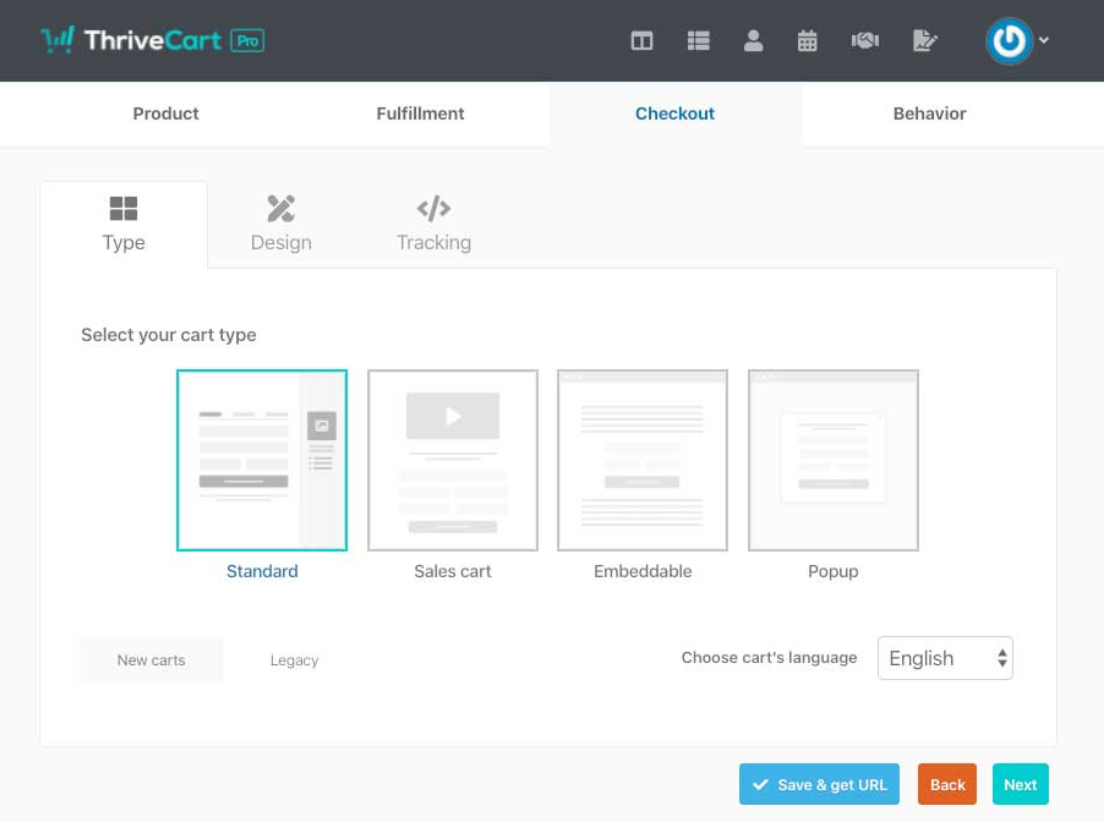
There is a wide range of cart templates available in ThriveCart that you can use to create checkout pages. Below are some different types of models discussed:
- Standard: It is the type of model where you can split the checkout page into two sections. One with the main content and the other one with the sidebar. You can add content on both sides of the page, whether it is the main section or above the checkout section.
- Sales Cart: It is another type of template designed to make the single type of checkout page. You can easily add content with no sidebar and can be checked out at the bottom.
- Embedded Cart: In this type of checkout template, you can place it directly on the page on the website.
It can be inline with your content. It is made to be displayed when the button is clicked.
- Popup: It is the type of checkout template in which it can be added to your website. It loads when there is any click on the button.
All of these checkout pages contain a single step or multiple step fields that display all the contents. You can either split the contents of customer and billing information or display fields in one section.
How to Set Up the Cart Template Style in ThriveCart?
There are several options available when you look forward to creating and editing your product settings. You have to head out to the checkout tab, that can be seen after the type tab.
If these options are not available, you may have edited the product earlier using the legacy template. If you did so, then there is a way you can change it. You have to go at the bottom left of the page and switch between the legacy and the new carts.
Once the selection of the type of carts framework is made, then you can jump on the next tab to go to the design tab.

After selecting the type of cart, you have further options:
- Launch Editor: It is the checkout editor used to create and design the checkout and the success pages.
- Copy design from another product: This option will allow you to copy the design and content of the checkout page from another product. You can then easily couple the clicks of both the checkout pages of different products.
- Share or import another design: If someone has shared their checkout page design with you and you like it, then you can easily import that design of the checkout page in your account with the unique URL. If you want, then you can create your designs and share them with other people here.
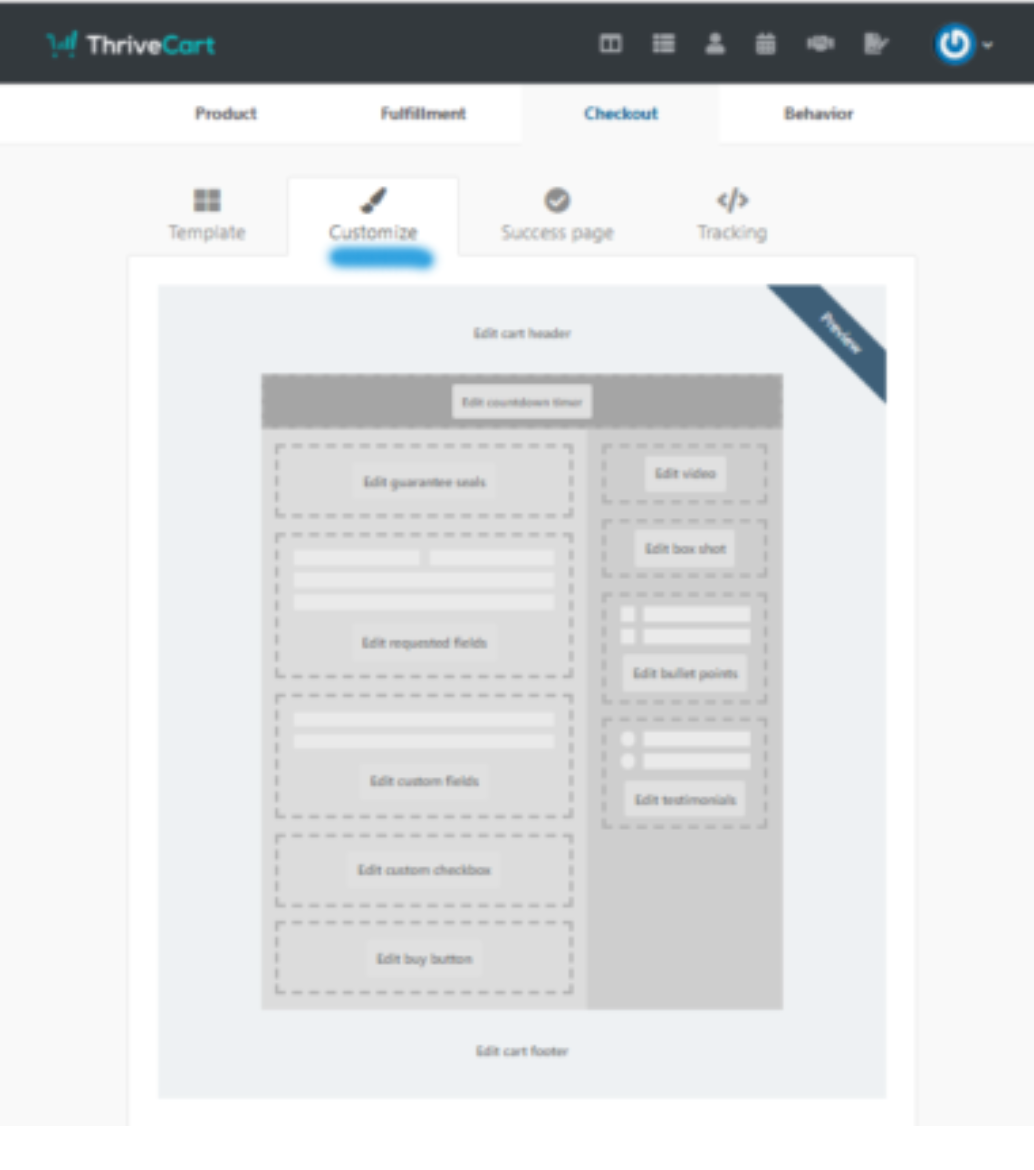
Do You Have the Ability to Customize These Cart Templates in ThriveCart?
Yes, you can customize the cart templates of your choice. There are several options available to customize it with the models. You can add some testimonials, guarantee seal, and thumbnail images of the product to attract as many customers as possible.
Quick Links:
- The Guide To ThriveCart & Membership Integration
- How Can You Integrate Everything with ThriveCart
- ThriveCart Frequently Asked Questions
- ThriveCart vs Zaxaa
- ThriveCart Vs ClickFunnel Comparison: (Pros & Cons)
Conclusion: Build Sales Pages & Cart Pages With ThriveCart
Above, you have studied the sales page and cart in ThriveCart and how they can be created? If you are an online business person and using ThriveCart, you must use it to create sales pages and carts. You can create these by using built-in templates with its customizable properties.
ThriveCart offers a wide range of models that can help you make the sales cart in no time. Here, the drag and drop builder is used for creating the same in just 6 minutes.
If you really enjoyed guidance on building sales pages & cart pages with ThriveCart then please do like and share this post with your friends. Also, share your experience with me in the comment section.