In this post I will represent a step-by-step guide to access HostArmada Website Builder. So, don’t forget to check the complete article.
To build a website, you need a lot of time and concentration. You have to develop a website by considering the developer’s need and the need for a visitor. You have to take care of plenty of measures while creating a site. Your website should be simple enough that can be easily understood and implemented by the visitors.
Here you will learn about an excellent feature of a website builder offered by HostArmada. You will study the working of this feature and how you can make a maximum from it. Let us check out all such details in this write-up.
How to Access HostArmada Website Builder 2024?

You need to consider some following steps to use this website builder:
1. How to Start a Website?
In the following category, you will learn about the guide with detailed instructions given about how to start a website using the HostArmada website builder. The details of the guide are focusing on the ease of the course. There are quick and easy steps given that can be followed to get your website ready with these fantastic steps:
2. How to Login into HostArmada Website Builder?
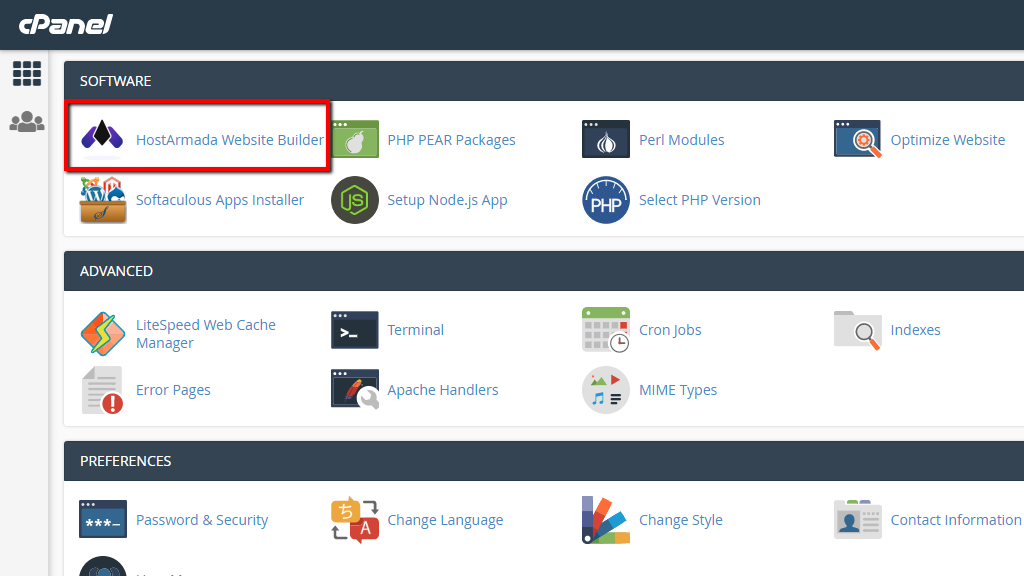
Hostarmada Website Builder has a unique feature of cPanel service, which offers an organized way of handling web hosting services. First, you have to login into the cPanel service, and then you can access the whole list of features offered by it.
If you want to access this feature of HostArmada of the website builder, you can either use a search box tool or the software category. When you find the feature on the list, you can click it, and then you will be directed to the default page from where you can easily manage your existing websites or create new ones.
3. How Can You Start a Newly Created Website With the HostArmada Website Builder?
To create a new website, first, you should have access to the HostArmada website builder. Once you get access to it, you will be standing on the dashboard’s defaulted main page.
The dashboard has an effortless design and structure on which you can very easily manage the builder functioning over the interface. All the options will be available on the left side, and the tools on the horizontal menu will appear at the top of the page. These tools will help you to control the creation of the website.
When you get friendly with the builder’s interface, you can easily understand the builder’s working. The first step you have to work with is the theme of the website. You will get two options while choosing the topic. You can also choose from the various template options from the list available on the dashboard.
One can browse among the several theme categories as per desires. After picking, you have to click to activate it, and then all the selected components of themes will get loaded, and you will be directed towards the theme editing page. You can then watch another guide for the editing of the theme page.
Website Management
In this following category of website management, you will learn about the various tutorials in which you will learn about managing multiple aspects of the page on the website.
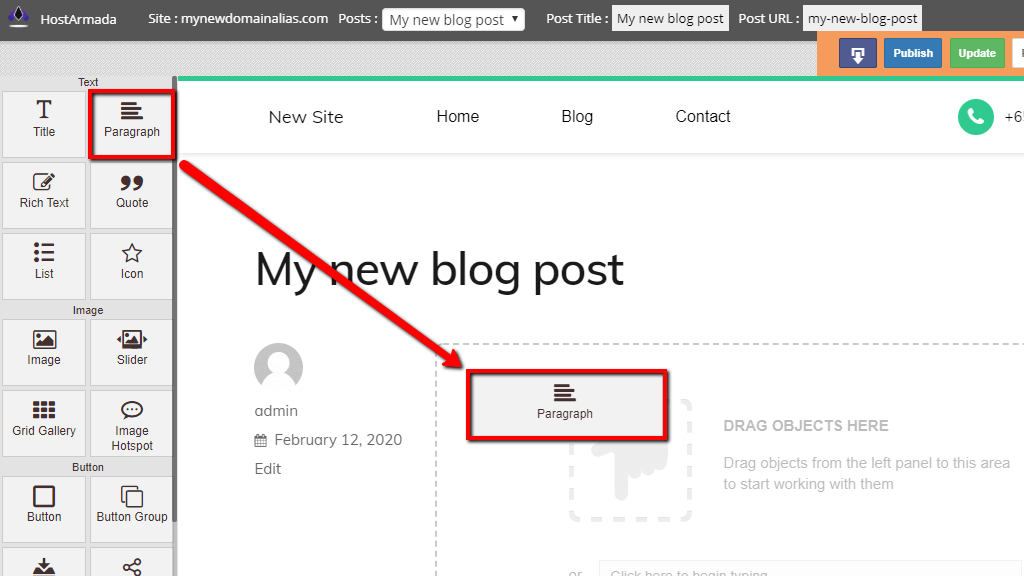
A. How Can You Edit a Page of the Website Builder in HostArmada?
There are multiple pages on a website that are carrying different types of data with it. If you want to edit a website, then you have to write it page by page. Publishing a website page is the crucial feature in the website builder of HostArmada with the drag and drop editor.
There are different types of steps in which you can edit your page. Let us discuss them in detail:
To Access the List of Available Pages
First, if you want to select the page that is already in existence. Then you have to make sure:
i) That the website you have created has been created with a theme.
ii) And the page you are going to edit should exist.
After you meet these two conditions, you can select the website and the page you want to edit. After choosing the site, you will see its domain name on the horizontal toolbar represented at the top of the page.
Then, you will have the option of All Pages; by selecting it, you will be directed on the page that will show you the list of pages a website is holding. From that list, you can choose the page you want to edit.
To Edit a Page that Built Through HostArmada Website Builder
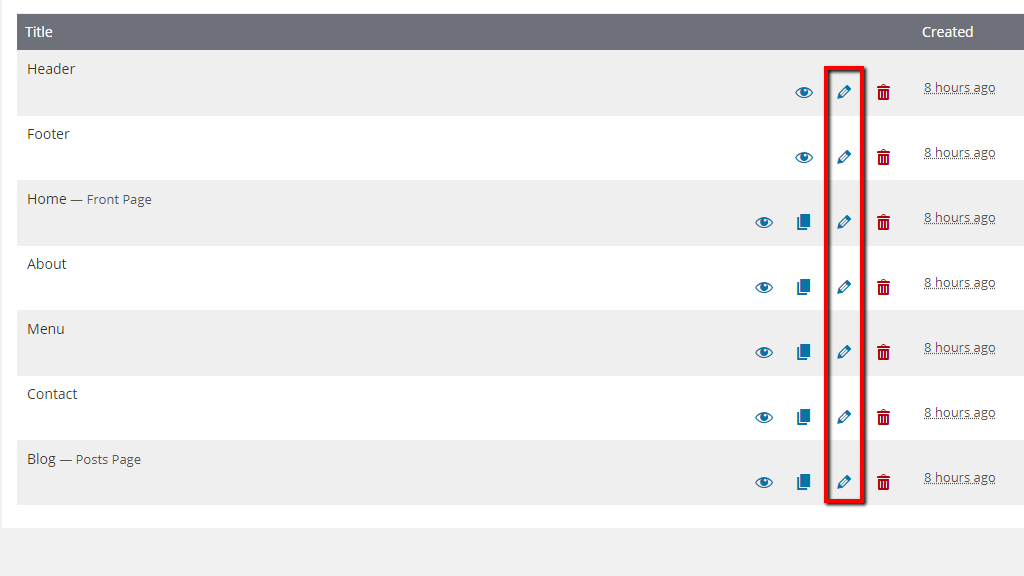
Before writing any page, you should have a complete understanding of which type of page you are selecting. There are various types of pages on a website with linked content of another page. So you have to care about it.
Firstly, click on the icon that looks like a pencil that gets displayed on each page to start the editing process. When you select it, you will be directed to the interface of editing pages. The page has a dashboard with full options on the left side and a horizontal toolbar on the page’s top.
When you have already selected the theme for your website, it will appear on pre-configured elements. Here you will have tools from which you edit the given features. You can quickly drag and drop the components from the tool menu to the page.
To Save and Publish the Page
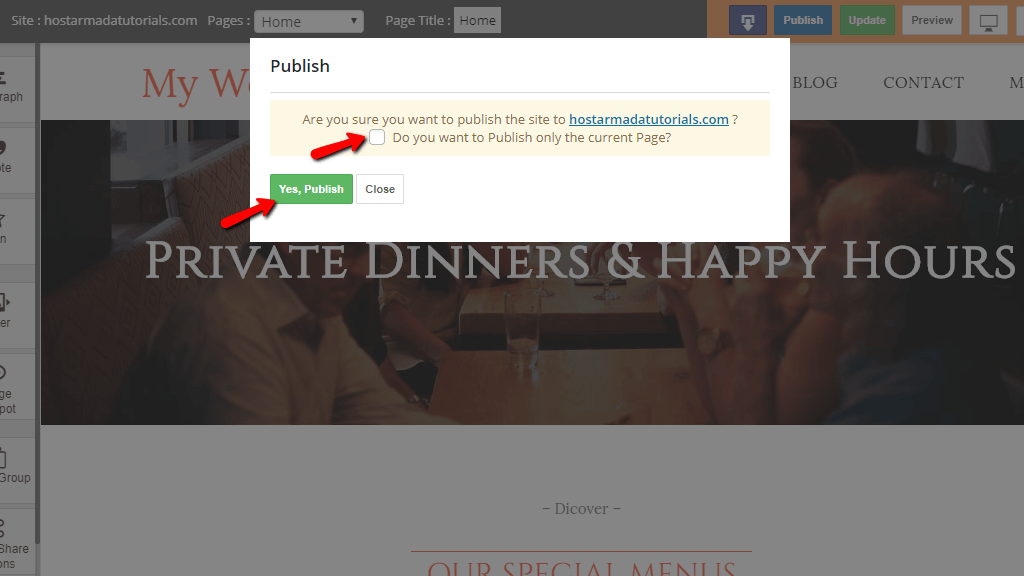
After editing your page, you have to save the changes. To do so, you have to first click on the update button that will appear in green color on the right side of the horizontal toolbar.
When your changes get saved, you have to update your website’s page to publish those changes. After updating, click on the Publish button and confirm it to post your changes permanently on your website.
B. How Can You Manage an Existing Website that is Built-in HostArmada by Using a Website Builder?
It is quite useful to have the opportunity to create a website without having any technical skills or knowledge of building sites. By using these secure and functional website builders, anyone can make a site. In this tutorial, you will learn to manage existing websites.
To Clone a Website that is Already in Existence
In HostArmada, you can add a new website as well as manage the existing ones. You can make clones of the current sites with the same design and structure but different data.
For cloning an existing site, you have to go on the Site menu to find a sub-menu by clicking on the Clone Site option. After clicking on it, you will be directed on the configuration page with these options:
i) Source site
ii) Site Address
iii) Title of a Site
iv) Site Language
v) Site Name
After configuring these options, you can click on the clone button to complete the site’s cloning.
To Delete an Existing Website
When you are no longer in need of any website, then you can quickly remove it. You will have options to choose the page or the website you want to delete from the site link. So click on the Site link, select the website, and click on the trash can icon to remove that website after confirming it.
Remember one thing; you can not delete that website, which has your account’s primary domain.
C. How Can You Manage the Webpages of the Site You Have Built Using the Website Builder in HostArmada?
Before making any change on any page of the website, you have to confirm the right site and its page on which you want to make changes. You can select the correct website and its page by visiting the Site link to find every existing website.
To Access the Page Feature
To have access to the Pages feature, you have to click on the Pages option that you can find on the All Pages link. After clicking on it, you will be directed to a page with a list of available pages on the currently selected website.
To Add a New Page
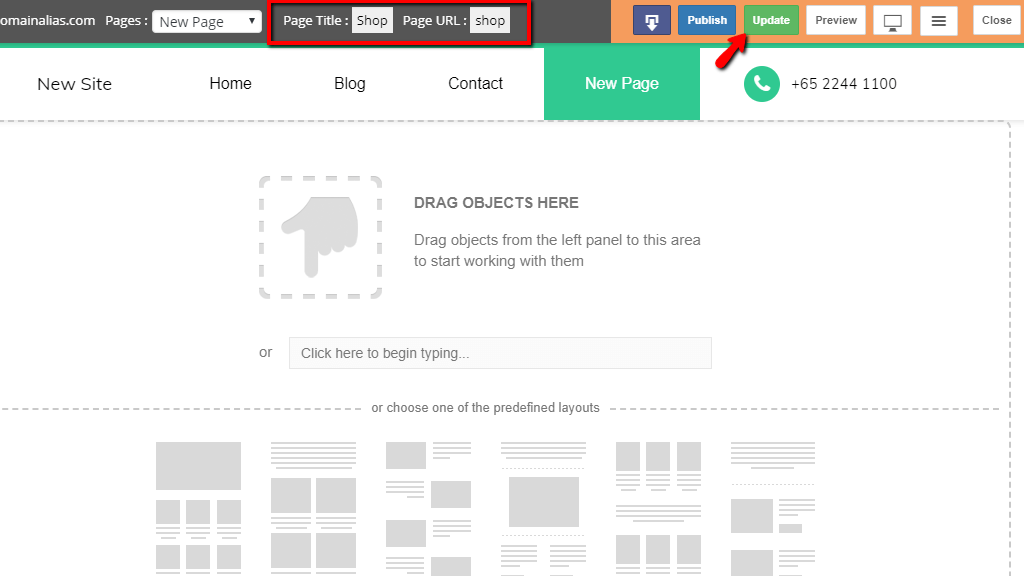
To add a new page, you have to click on the Add New option that can be found on selecting the Pages link. After clicking for the new page, you will be directed to the editing page to choose the page’s design and structure.
You will find different editing options with their tools like page title, page URL, color, etc. To have more information about how to edit a page, you can use the guide.
To Delete an Existing Page
Select the page from the Pages option and click on the trash can icon to delete that selected page by confirming it. The page will get removed and reside in the trash collection in case you want to restore it.
D. How Can You Manage a Blog Created Through the Website Builder in HostArmada?
The blog is where you can write a considerable amount of content by explaining every website’s functionality. Below you will learn how to work with blogs.
To Access the Existing Blog
To write a blog for your website, you have to make sure that you are on the right website. When the site is chosen, you can access the correct page and start your blog by clicking on the Blog option you can find in the All Posts link. After clicking, you will be directed to the page where you will have your posted blogs.
To Create a New Blog
Click on the Add New option to work on the new blog. The process is the same as editing a page. Like to post a title, date after getting directed to the editing page of the site. After making changes to your blog from the editing page, you can update it to publish it further. You have to click on save then on the post to see your blog on your website.
To Edit a Blog
To write the existing blogs, you have to select the blog you want to write. After selecting you will see a pencil-like option, on clicking on that option, it will lead you to the page that contains editing options for your blog. After editing, you have saved the changes; then you have to publish it on your website.
To Delete an Existing Blog
Suppose you are no longer in need of a blog on your website. You can simply select the blog from the Blogs option and click on the trash can icon to delete that page chosen by confirming it.
E. How Can You Manage the Blog Post Categories Built by the Website Builder in HostArmada?
You always keep on editing the blog post by the changing time. To make changes to an existing blog post, you just have to select it, and a pencil-like option will appear. On clicking on that option, you will be directed to the editing page, where you can find fields that have already been filled with some data.
You can change them with ease as per your need and then click on save and update the option to upgrade the changes. Then an acknowledgment message will be displayed at the top of the page showing the saved changes.
F. How Can You Manage Your Website Blog Tags Built Through the Website Builder in HostArmada?
There are a few steps with which you can work to add new, edit, and delete the blog tags on your website blogs.
To Add New Blog Tag
If you want to add a new tag to your blog, you have to edit the existing blog. To select a current blog, you can read it in how you can write an existing blog.
After editing the blog, you have to click on the add button to add the tags after writing a suitable tag on the given single-line text area. Your blog tag will be added; you have to click on the save button then update it to publish it finally on your website.
To Edit Existing Blog Tag
You will find a pencil-like icon after selecting the tag name you want to write. There are options that you can edit
i) Name
ii) URL
iii) Description
iv) Slug
After completing your editing part, you have to update and publish the changes on your website.
To Delete Blog Tag
Select the Blog tags from the Blog Tag option and click on the trash can icon to delete that selected page by confirming it. Your blog tag will be removed.
G. How Can You Select the Website’s Visual Themes that are Built Through the Website Builder of HostArmada?
HostArmada has a collection of predefined visual themes from which you can choose from for your website. Below you will learn about how to choose a theme and how to apply it.
To Choose a Visual Theme for Your Website
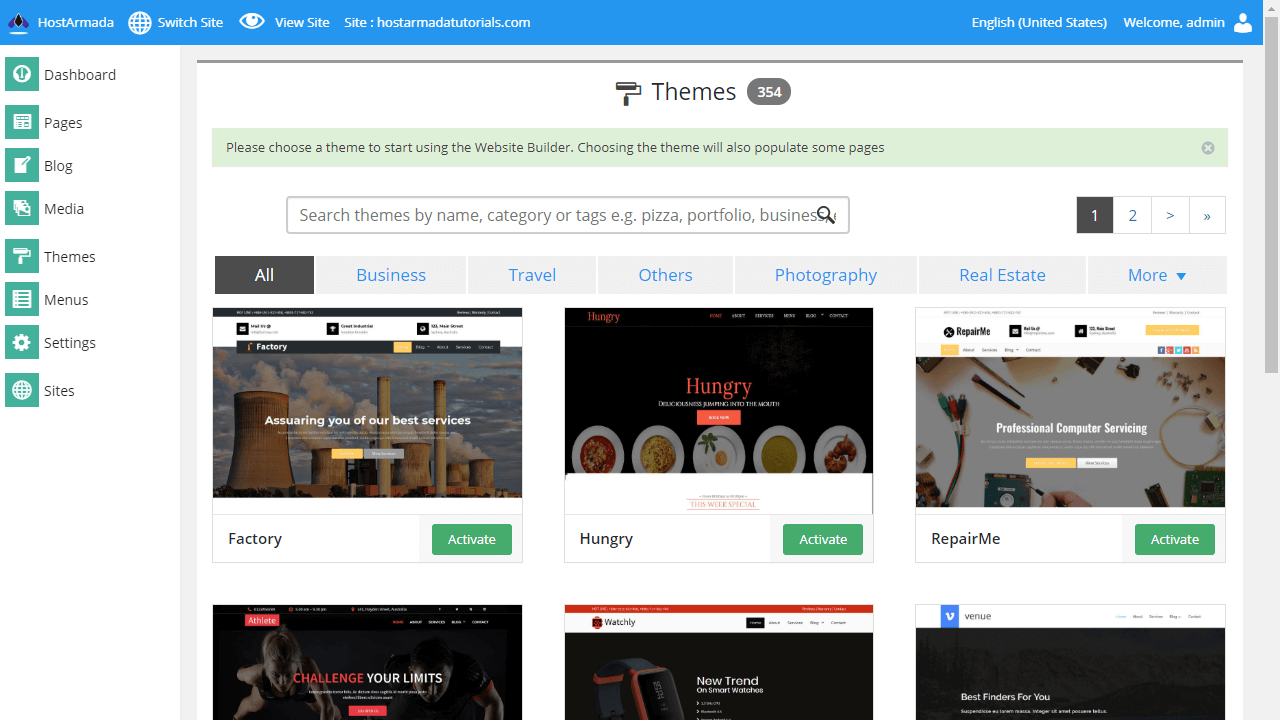
If you want to select a visual theme for your website, you must look into the offered list of visual themes. If there is already a chosen theme, then you have to change it.
Before choosing a new theme for your website, you have to look at some data about the theme by clicking on the Details button. There you will get access to the demo of the selected theme. After finalizing our theme, you can click on the Activate button.
After selecting to activate the theme, your current will get changed to the selected one. You can then visit your website and check up on your favorite chosen theme.
H. How Can You Manage the Menus that are Built Through the Website Builder of HostArmada?
A menu is a component that is accessed by the visitors to jump from pages to pages with ease. The list contains all the elements of a page or a website. Menus are there to help visitors to move on a website with a few clicks.
To Access Menus on Your Website
Like other features in HostArmada, menus can also be edited independently. There is a separate defined page to select the menus of your website. You access that page by clicking on the Menu link located at the vertical menu on the page’s left side. There you will get all the essential elements of menus, and you can easily edit them and save the changes.
I. How Can You Configure a Website?
In this category, you will learn about the configuration setting of a website and configure different parameters of a website.
J. How Can You Configure the Different Settings of a Website Built Through a Website Builder in HostArmada?
Users can configure some settings. The following are those settings defined with their tutorials.
General Settings
You have to visit the navigational menu to get to the broad parameters of a website. When you select on the General from the settings list then you will be directed to the page with the following settings to configure:
- Site title
- Email address
- Tagline
- Date format
- Time format
- Time zone
- Site language
- Week starts on
When you are done with your changes, you can simply save them.
Writing and Reading Settings
You will see other options in the same settings option, like writing, reading, editor, media, etc. By clicking on the writing settings, you will be directed to the blog page.
But when you click on the reading settings, you will be directed to a page that has the following options to be configured:
- Full-width blog
- Frontpage display
- Blog page show at most
- Hide date on blog
- Hide navigation on the blog
- Syndication feeds show the most recent
- Hide user details on the blog
- Search engine visibility
You can edit it as per your desires but not forget to save the changes.
Media Settings
In your website’s media settings, you will have settings regarding the images and media files you add on your website. With this setting option, you can change the image’s size too small, medium, or large.
The option you will get in the same navigational menu. By clicking on it, you will be directed to a page with an element of editing the media files’ dimensions. After making the changes, you can save them by clicking on the save button.
Editor Settings
Editor settings will allow you to make changes to the content of the website. You can find this option in the same navigational menu. Following are the settings offered in the editor settings:
- Fixed row width
- Custom HTML code
- Spelling check
- Custom CSS code
- Custom HTML footer code
- Except and more tag
- Google fonts
After you are done with editing, you have to save the changes.
K. How Can You Configure the Settings of the Contact Form in the HostArmada Website Builder?
HostArmada offers a fully functional contact form that can send messages, ask questions, generate requests, and many more. You have a proper configuration option available with this feature also.
To Configure the Contact Form Settings
You will get a Contact form page by default with any template you will select to build your website. A page named Contact will be displayed in the list of other available pages of the website.
You will be directed to the web page that takes the actual contact submitted in the form and will further send by an email account to add touches.
K. How Can You Enable and Configure the Cookie Consent in the Website Builder of HostArmada?
Cookies are a piece of data that is stored in the visitor’s computer by a website. It is useful when the visitor wants that website again and wants to access the same data once again.
To Enable and Configure
When you allow Cookie consent, a notice will appear on your website to inform visitors that the site uses cookies. It is up to you to enable cookie consent. If you allow, you will get various options to configure the banner:
i) Position
ii) Layout
iii) Color
iv) Text
After completing the configurations, you just have to save the changes by clicking on the save button.
Quick Links:
- Magento 2 Hosting By HostArmada | Is It Worth The Hype?
- HostArmada Review : Is It Worth The Hype?( Pros & Cons)
- Webnode Review: Ultimate Website Builder (TRUTH) (Pros & Cons)
- How Can Website Builders Benefit You When Starting A Blog
- ClickFunnels Review
- Gravity Forms Review
- Ecwid Review
- Sellerlabs Review
- Clickcease Review
- Rank Math Review
- Link Whisper Review
Conclusion: How To Access HostArmada Website Builder 2024?
HostArmada is an open-source platform that allows you to create a website without technical knowledge or skills. Above, you have read about the method of creating a website and configuring the various features on a website.
👉Get Started With HostArmada Website Builder
You can take the help of the guide to building your website by using the HostArmada Website Builder. And, If you really enjoyed HostArmada Website Builder guide then please do like and share this post with your friends. Also, share your experience with me in the comment section.